AFLNET是一个基于AFL开发的网络协议测试工,已在2020年ICST上被接受发布,本文简单尝试使用。
AFLNET是一个基于AFL开发的网络协议测试工具,其最大的优点在于有效地利用了服务器的响应信息,以指导下一次的Fuzz。
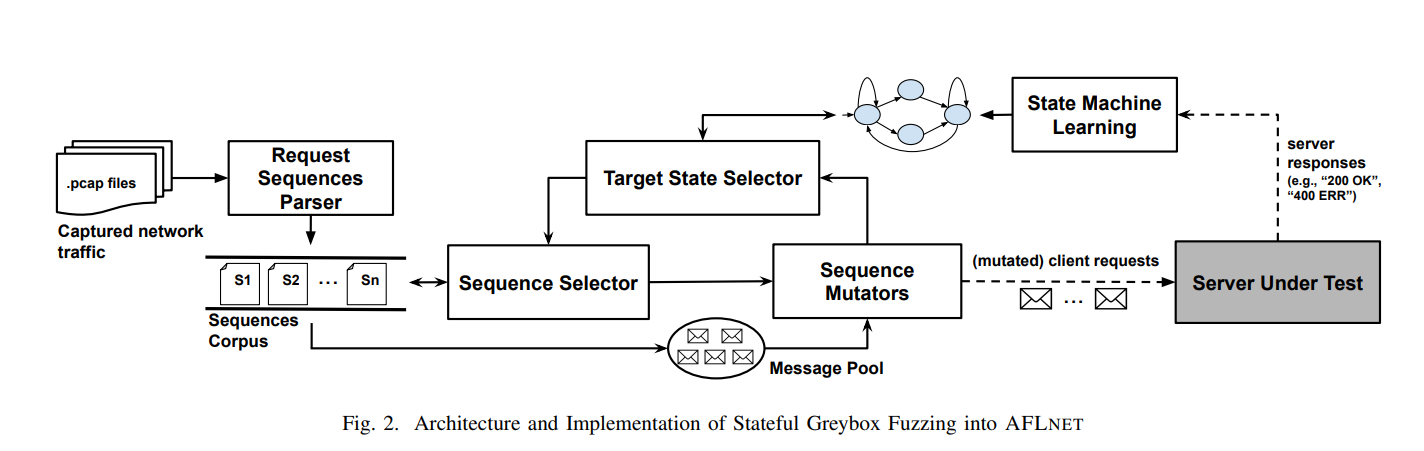
有状态的黑盒模糊检测(SBF)是目前比较受欢迎的fuzz方法,学术界Sulley或BooFuzz,工业界的Peach,特点是利用FSM或者图遍历协议模型,并生成符合语法的消息序列。这种方法虽部分解决了第一个挑战,但是其的效果通常取决与设计的状态模型,这种模型通常需要由有经验的分析者/开发者基于对该协议的知识,以及结合端点之间的网络流量具体设计。设计的模型可能不会百分百符合黑盒内的协议,毕竟网络协议的实现取决于各个开发者,可能存在对协议的误解,或是实现时增加新的特性。此外现有的SBF方法尽管可以生成一些数据去触发一些特殊状态,然而并未将这类数据进行保留以指导未来的fuzz行为,例如,并不会更新现有的状态模型。针对这个问题,AFLNET的解决方案是比较合理的。
其流程可以描述如下:程序的输入是数据包文件,程序内部的parser会对数据包进行分析,Parser随协议不同而采用不同设计,目的在于解析出Request请求,这些请求将组合为一个个序列,作为序列数据集。数据集中的序列会通过Mutator变异后发往Server,Server对request返回response,response数据包将被程序捕获,提取其中的状态码,判断该状态码位于FSM的何处,若原本的模型中不存在该状态码,则FSM中会增加一个结点代表该状态。程序中的State Selector将会分析程序当前的FSM模型,从中选出较少遍历/未曾遍历的状态(这是通过一个优先级机制实现的),传递给sequence selector,使之选择出可以触发该状态的request序列。当然,一开始由于缺乏统计信息,State的选取是随机化的。
安装
aflnet官方的教程非常详细,首先下载
# First, clone this AFLNet repository to a folder named aflnet
git clone <links to the repository> aflnet
# Then move to the source code folder
cd aflnet
make clean all
cd llvm_mode
# The following make command may not work if llvm-config cannot be found
# To fix this issue, just set the LLVM_CONFIG env. variable to the specific llvm-config version on your machine
# On Ubuntu 18.04, it could be llvm-config-6.0 if you have installed clang using apt-get
make
# Move to AFLNet's parent folder
cd ../..
export AFLNET=$(pwd)/aflnet
export WORKDIR=$(pwd)
aflnet的用法和afl非常相似,可以afl –help查看详情
- -N netinfo: server information 服务器信息 (e.g., tcp://127.0.0.1/8554)
- -P protocol: application protocol to be tested 目标的协议类型 (e.g., RTSP, FTP, DTLS12, DNS)
- -D usec: (optional) waiting time (in micro seconds) for the server to complete its initialization 等待时间
- -K : (optional) send SIGTERM signal to gracefully terminate the server after consuming all request messages 使用所有请求消息后发送SIGTERM信号以正常终止服务器
- -E : (optional) enable state aware mode 启动状态感知模式
- -R : (optional) enable region-level mutation operators 启用区域级别的突变运算符
- -F : (optional) enable false negative reduction mode
- -c script : (optional) name or full path to a script for server cleanup 服务器清理脚本的名称或完整路径
- -q algo: (optional) state selection algorithm 状态选择算法(e.g., 1. RANDOM_SELECTION, 2. ROUND_ROBIN, 3. FAVOR)
- -s algo: (optional) seed selection algorithm种子选择算法 (e.g., 1. RANDOM_SELECTION, 2. ROUND_ROBIN, 3. FAVOR)
实例命令:
afl-fuzz -d -i in -o out -N <server info> -x <dictionary file> -P <protocol> -D 10000 -q 3 -s 3 -E -K -R <executable binary and its arguments (e.g., port number)>实践–以dnsmasq为例
首先下载dnsmasq的源码,切换版本到2.73,使用afl-clang-fast进行编译
# Assuming AFLNet is in ~/aflnet
export AFLNET=$HOME/aflnet
export WORKDIR=$HOME
export AFL_PATH=$AFLNET
if [[ ! $PATH == *"$AFLNET"* ]]; then export PATH=$AFLNET:$PATH; fi
cd ~
# Clone the Dnsmasq repository
git clone git://thekelleys.org.uk/dnsmasq.git
# Move to the directory
cd dnsmasq
# Checkout a specific version
git checkout v2.73rc6
# Compile source
CC=$AFLNET/afl-clang-fast make
# Copy configuration file
sudo cp $AFLNET/tutorials/dnsmasq/dnsmasq.conf /etc/
# Move to the src directory
cd src/成功编译Dnsmasq之后,我们可以通过添加地址来解析并dig用于查询主机名来测试服务器:
# Add an address to resolve
echo address=/test.com/5.5.5.5 | sudo tee -a /etc/dnsmasq.conf
# Run Dnsmasq and don't daemonize (the dnsmasq.conf file will specify port 5353)
./dnsmasq
然后我们dig一下目标
dig @127.0.0.1 -p 5353 test.com

; <<>> DiG 9.11.3-1ubuntu1.12-Ubuntu <<>> @127.0.0.1 -p 5353 test.com
; (1 server found)
;; global options: +cmd
;; Got answer:
;; ->>HEADER<<- opcode: QUERY, status: NOERROR, id: 40722
;; flags: qr aa rd ra ad; QUERY: 1, ANSWER: 1, AUTHORITY: 0, ADDITIONAL: 0

;; QUESTION SECTION:
;test.com.            IN    A

;; ANSWER SECTION:
test.com.        0    IN    A    5.5.5.5

;; Query time: 0 msec
;; SERVER: 127.0.0.1#5353(127.0.0.1)
;; WHEN: Tue May 19 14:19:38 EDT 2020
;; MSG SIZE  rcvd: 42
可以开始进行fuzz了
cd $WORKDIR/dnsmasq/src
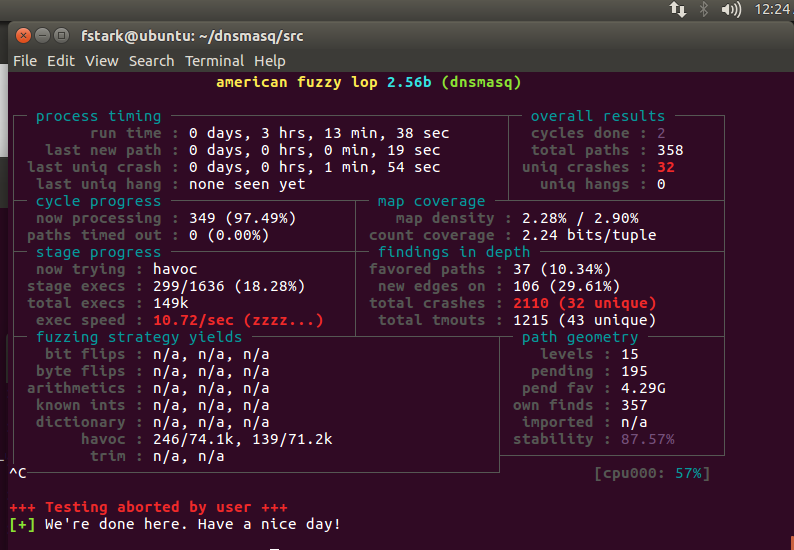
afl-fuzz -d -i $AFLNET/tutorials/dnsmasq/in-dns -o out-dns -N tcp://127.0.0.1/5353 -P DNS -D 10000 -K -R ./dnsmasq运行一段时间后就会有crash了
当有crash之后我们如何重现漏洞现场,aflnet之中自带了重现工具aflnet-replay,具体用法类似于
aflnet-replay packet_file protocol port [first_resp_timeout(us) [follow-up_resp_timeout(ms)]]我们可以先gdb 一下dnsmasq然后使用aflnet-replay发送poc
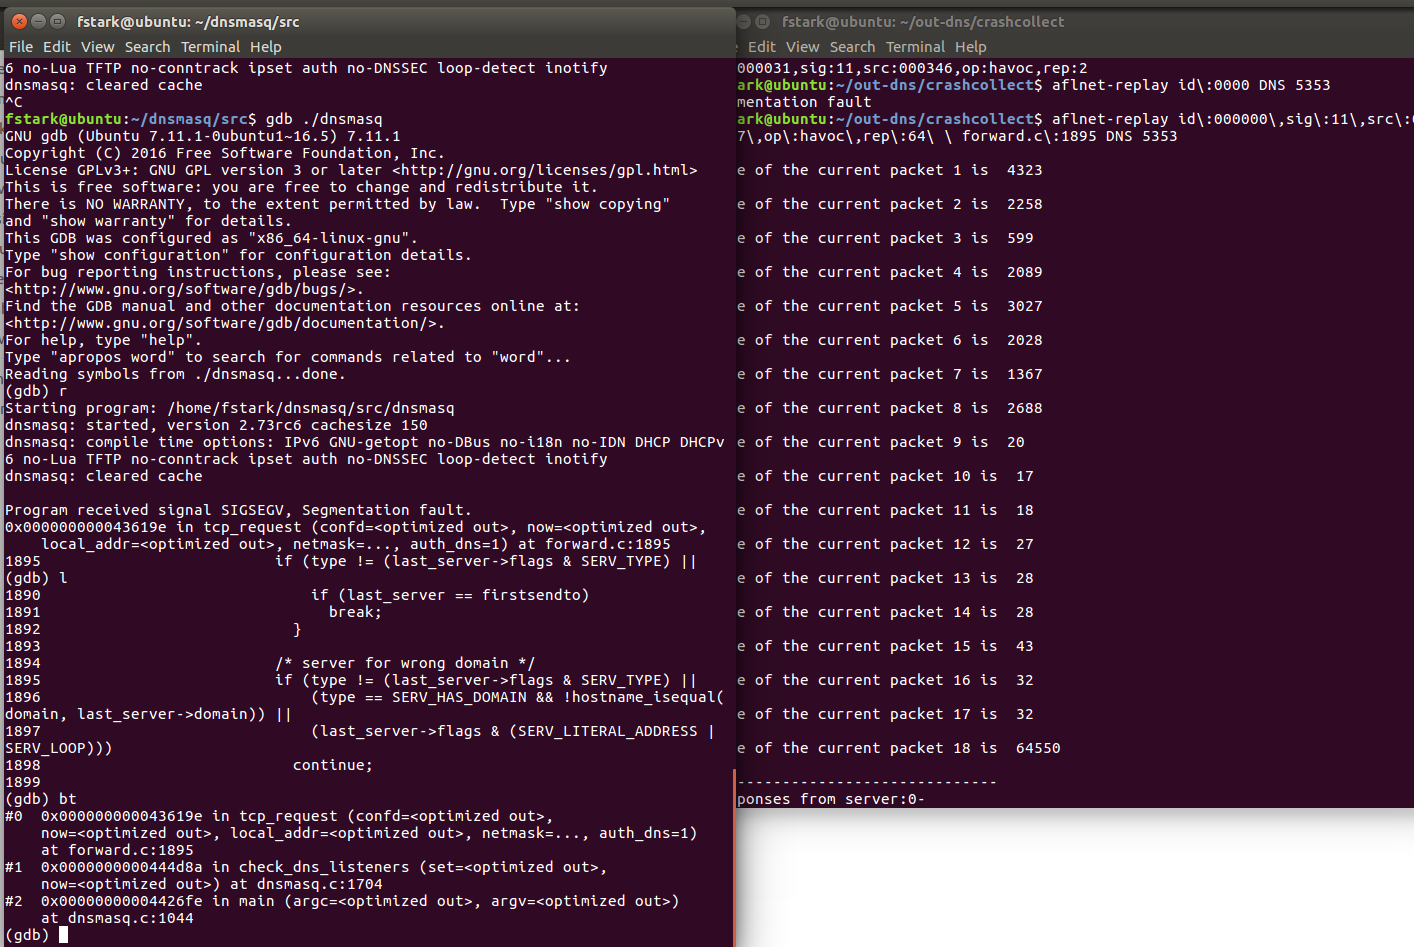
可以看到目标服务崩溃了,位置断在forward.c:1895上
相同思路可以应用到其余的网络协议服务之上,比如bind9的named应用程序,但是发现可能会存在crash误报的情况,按理来说aflnet通过识别发送回的状态码进行服务器状态判别应该误差不会太大,还要再读一读论文了解一下原理。

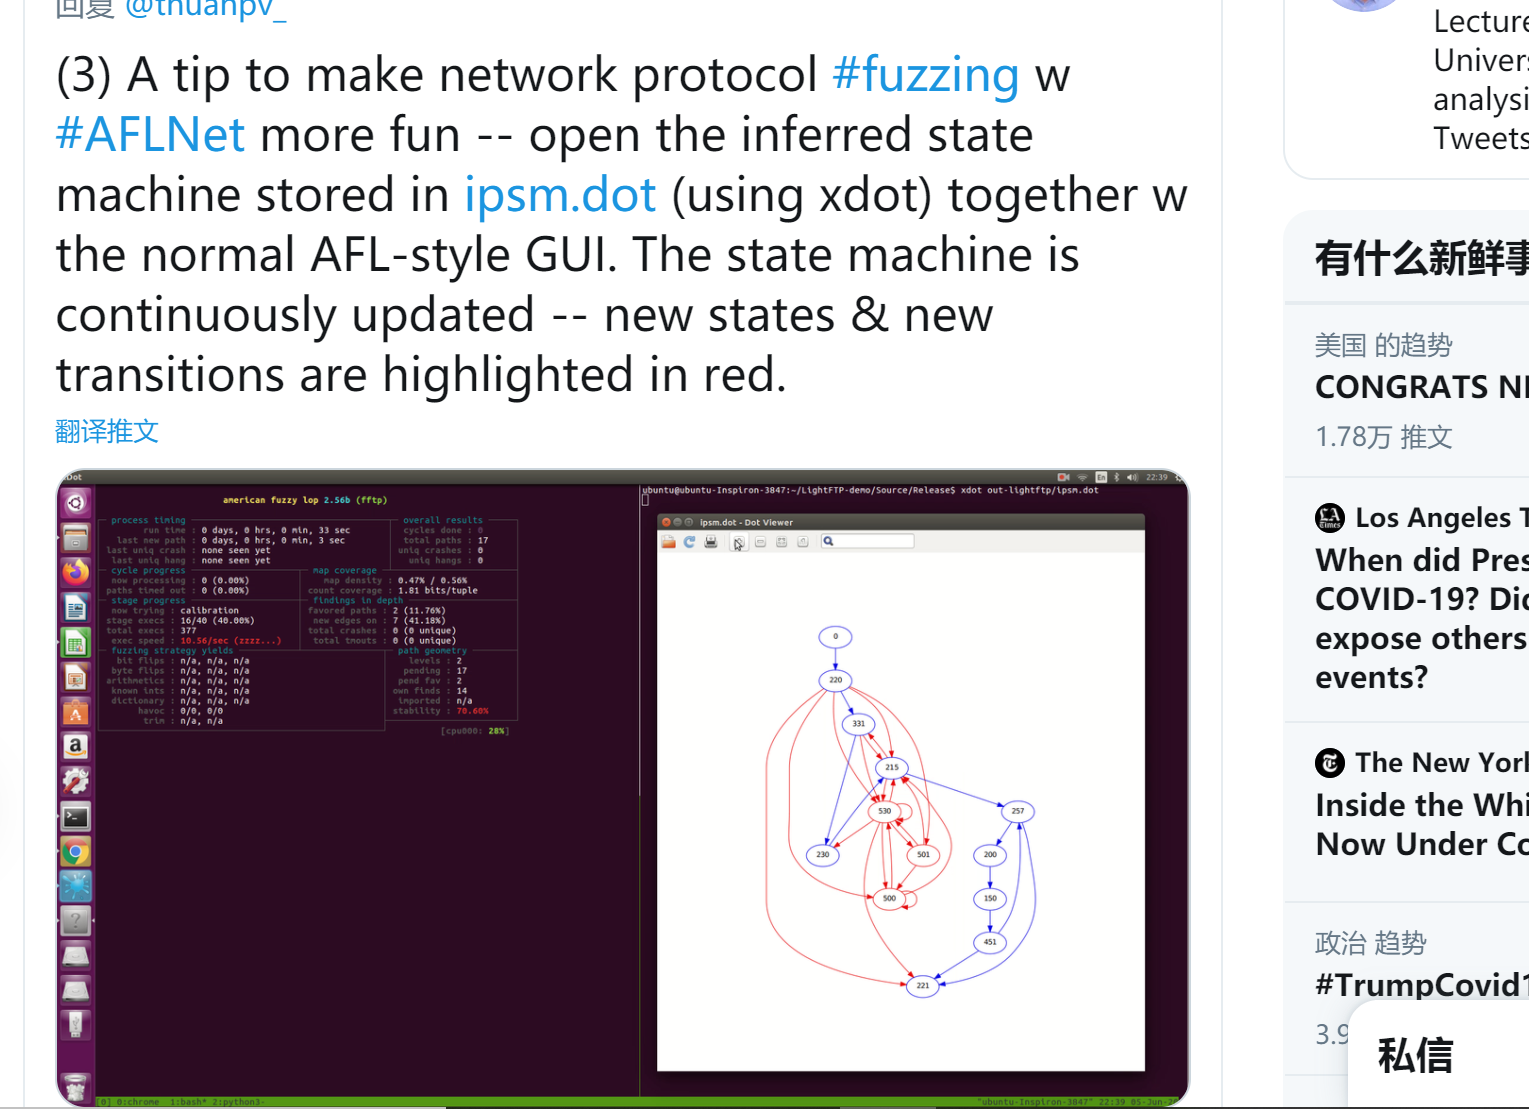
aflnet还有很多功能可以进行探索,比如作者在推特上提到的ipsm.dot,可以时时看到fuzz的进程进度。